How to Find All the E Notes on Guitar: A Beginner’s Guide
Learning the fretboard can feel like a lot to remember. Start with just one note: E.
Finding E across the strings gives you useful landmarks for recognising notes, locating chord roots and connecting different areas of the neck. You don’t have to memorise the whole fretboard at once.
Watch the video, then use the fretboard map and exercise below to find the notes on your own guitar.
Start with the two open E strings
In standard tuning, the open strings are:
E – A – D – G – B – E
The thickest string—the sixth string—is low E. The thinnest string—the first string—is high E.
Play them one at a time. They share the same note name, but the high E string sounds two octaves above the low E string.
These are your first two landmarks, and you don’t need to fret either one.
Find an E on each string
Work across the guitar from the thickest string to the thinnest:
| String | Where to play E |
|---|---|
| 6th string — low E | Open |
| 5th string — A | 7th fret |
| 4th string — D | 2nd fret |
| 3rd string — G | 9th fret |
| 2nd string — B | 5th fret |
| 1st string — high E | Open |
Find each position slowly and say “E” as you play it. Notice both the string and the fret rather than memorising the fret number by itself.
These notes are all E, but they aren’t all the same pitch. Some are the same pitch played in different places; others are an octave or more apart.
See the E notes across the fretboard
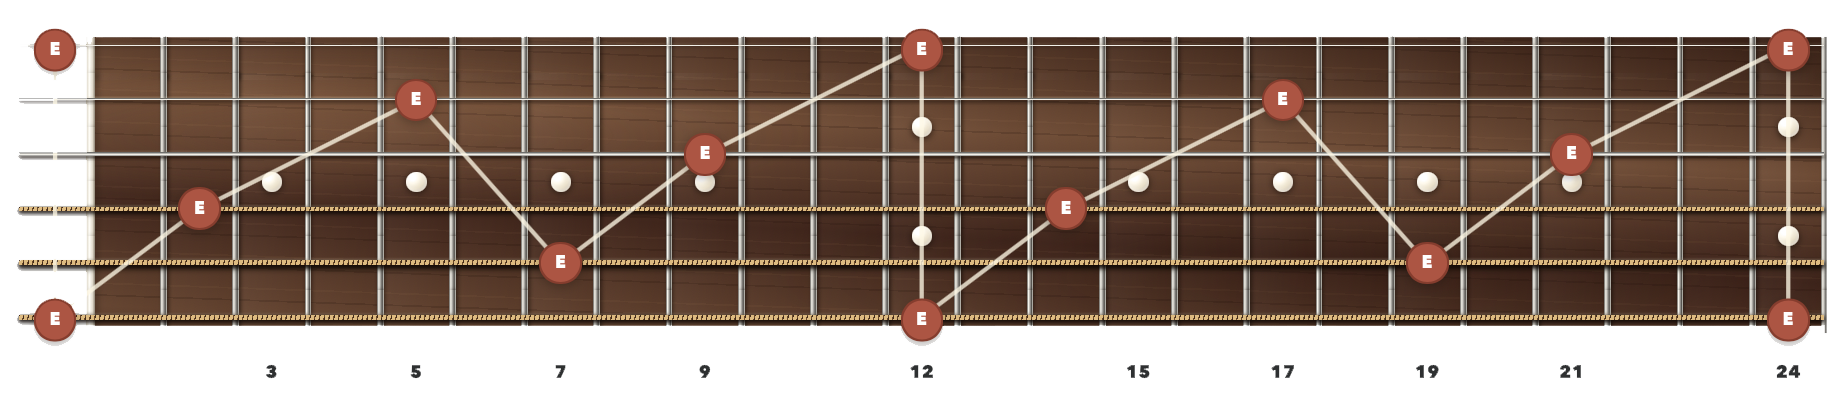
Use the red E markers to connect the positions you have just found. The two outside strings have matching note locations because both are tuned to E.
The connecting lines give you a visual pattern to recognise. You don’t need to slide along them or play the notes in that order.
Reading the fretboard map
This is a horizontal fretboard diagram: the thin high E string is at the top, and the thick low E string is at the bottom. Fret numbers increase from left to right.
An E marker to the left of the nut means play the string open. The numbers beneath the neck identify frets, not fingers.
Tap or click the fretboard map or TAB to open the full-size image in a new tab, then zoom in as needed.
Repeat the pattern 12 frets higher
Here is the shortcut that makes the rest of the neck easier:
Move 12 frets higher on the same string and you find the same note name, one octave higher.
That means:
- An open E repeats at the 12th fret, then the 24th fret.
- E at the 2nd fret repeats at the 14th fret.
- E at the 5th fret repeats at the 17th fret.
- E at the 7th fret repeats at the 19th fret.
- E at the 9th fret repeats at the 21st fret.
You are learning a repeating pattern, rather than a completely new set of locations above the 12th fret.
Every E position up to the 24th fret
Use this table as a quick reference:
| String | E-note positions |
|---|---|
| 6th string — low E | Open, 12, 24 |
| 5th string — A | 7, 19 |
| 4th string — D | 2, 14 |
| 3rd string — G | 9, 21 |
| 2nd string — B | 5, 17 |
| 1st string — high E | Open, 12, 24 |
If your guitar has fewer than 24 frets, simply use the positions available on your instrument.
Practise finding the notes

First, find the notes at your own pace. Concentrate on choosing the correct string and fret and producing a clear sound.
The TAB is in 4/4 at 60 BPM. Play one note per beat, reading from left to right. In the last bar, play the two notes on beats 1 and 2, then rest for beats 3 and 4. The exercise visits all 14 E-note positions available on a 24-fret guitar, including the two open strings. If your guitar has fewer frets, leave out the notes beyond its range.
Then try this:
- Find one E on each string. Use the first table to check your answers.
- Work back across the strings. Start on the high E string and return towards the low E.
- Choose strings in a different order. Find E on the B string, then the D string, then the A string.
- Find the octave. Where your guitar allows, play an E and then another E 12 frets higher on the same string.
- Look away from the diagram. Try recalling a position before checking it.
Keep the movement relaxed and the notes clear. Speed can come later.
Listen as well as look
Play the B string at the fifth fret and the high E string open. They produce the same pitch in standard tuning, although their tone may sound different.
Now play the D string at the second fret. This E is one octave below the open high E.
Now compare the open low E with the 12th fret of the low E string. The second note is one octave higher.
Listening to these relationships helps you connect the fretboard pattern with actual sounds.
What can you do with these landmarks?
E is the root note of both E major and E minor. Knowing where it appears helps you recognise the roots within those chord shapes and begin connecting shapes across the neck.
For a practical chord exercise, try changing between Am and Em using a pivot finger. The middle finger that stays on the D string at the second fret is holding an E note.
Once these locations feel familiar, repeat the process with another note. Build your knowledge a little at a time, using the 12-fret repeat to connect the lower and upper parts of the neck.
Fretboard Freedom is coming soon, with structured lessons connecting notes, chords and scales across the guitar. Use the email signup below if you’d like course news and new resources.
Ready to put it all together?
Build your skills with a clear sequence of lessons and practical songs. Find a guitar course that fits where you are now.
Useful guitar ideas, occasionally.
Get practical tips, new resources and course updates from Reuben. A little inspiration for your playing, without a crowded inbox.
By signing up, you agree to receive guitar tips and course news by email. Unsubscribe at any time.