How to Change Chords Easily Using Pivoting: Am to Em
Changing chords doesn’t always mean lifting every finger and starting again. Sometimes, one finger can stay exactly where it is while the others move around it.
This is called using a pivot finger. It gives your hand a reference point and reduces how much you need to move.
Watch the video, then practise switching between A minor (Am) and E minor (Em) using the chord diagrams and TAB below.
What is a pivot finger?
A pivot finger stays on the same string at the same fret as you change chords. The other fingers move into their new positions around it.
For this Am–Em change, your middle finger stays on the second fret of the D string.
Keep it in contact with the string without gripping tightly or locking your hand in place. Your hand should remain relaxed enough for the other fingers to move freely.
Reading the diagrams
1 = index, 2 = middle and 3 = ring finger. The red dots mark the chord’s root notes, not the pivot finger. Your pivot is finger 2 on the D string in both shapes.
Tap or click any chord diagram or TAB image to open the full-size version in a new tab, then zoom in as needed.
Start with A minor
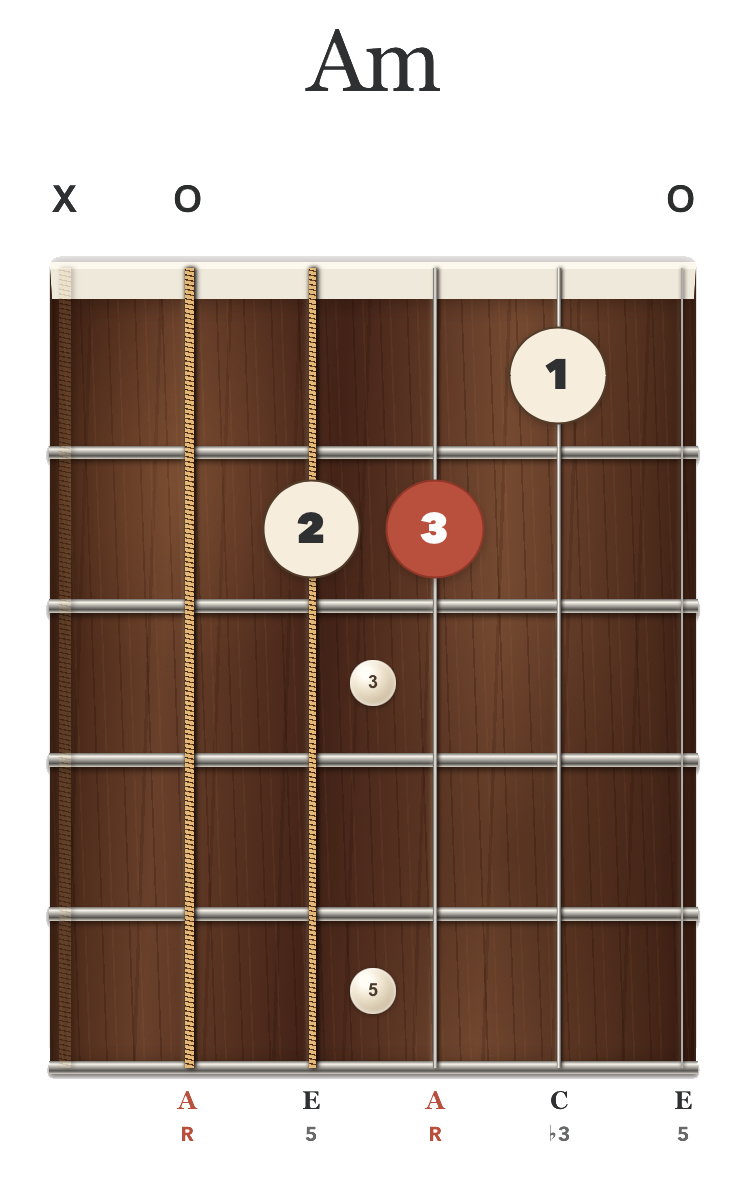
Place your fingers as follows:
- Index finger: first fret of the B string.
- Middle finger: second fret of the D string.
- Ring finger: second fret of the G string.
Play the A and high E strings open. Strum from the A string, leaving out the low E string.
Pick each sounding string individually to check that the notes are clear.
Change to E minor
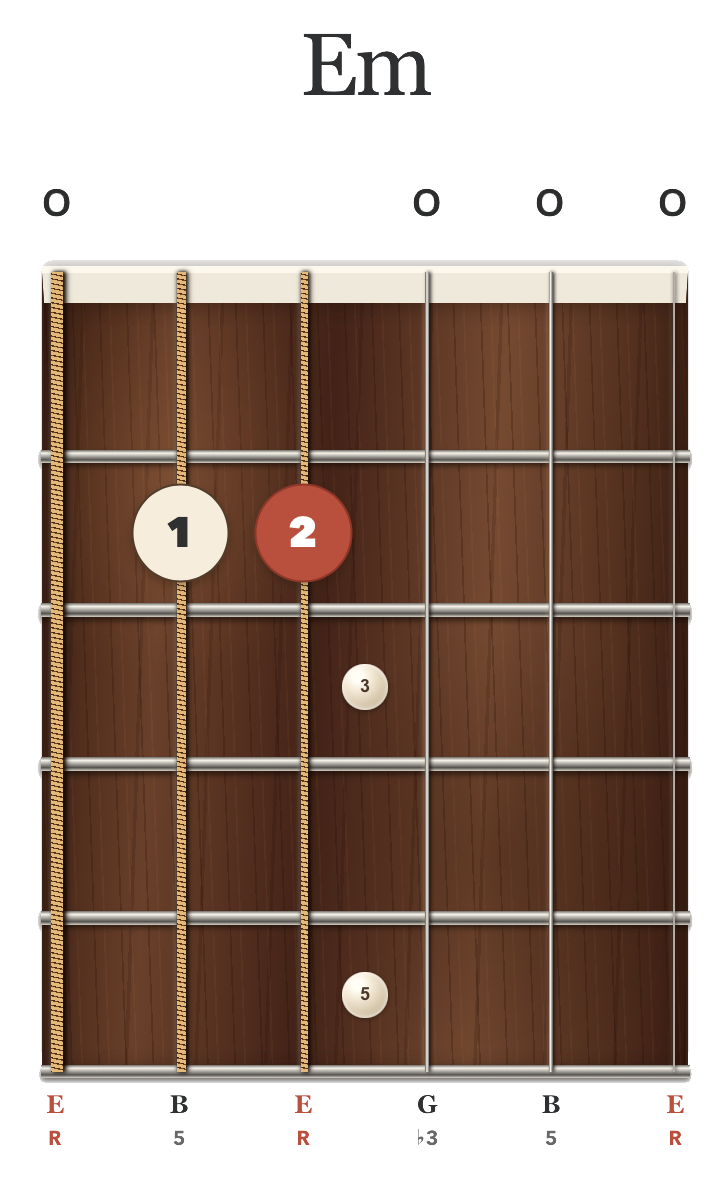
Keep your middle finger on the second fret of the D string. That is your pivot.
Then:
- Move your index finger from the B string to the second fret of the A string.
- Lift your ring finger off the G string so that string can sound open.
You now have E minor. The low E, G, B and high E strings are open, so you can strum all six strings.
There are other valid fingerings for Em. Use the index-and-middle fingering shown here to keep the middle finger as your pivot.
Change back to A minor
Leave your middle finger in place again.
Move your index finger back to the first fret of the B string, and place your ring finger on the second fret of the G string.
Strum from the A string to hear Am.
The middle finger stays in the same position in both directions. You only need to organise the fingers that change.
Practise the change with the TAB

Start by switching between the shapes slowly, without worrying about keeping a beat.
- Form Am and check the notes.
- Keep your middle finger in place.
- Move your index finger and lift your ring finger to form Em.
- Check the notes, then reverse the movement.
- Repeat, keeping your hand relaxed and your movements small.
When you can find both shapes comfortably, follow the TAB: it is in 4/4 at 60 BPM. Strum once on beat 1 of each bar and let the chord ring while you count 1, 2, 3, 4. Change to the next chord on the following beat 1. Alternate Am and Em through the eight bars; the 4x marking means play the whole section four times in total. Slow the tempo further if you need more time to change.
Check your strumming range: Am uses five strings, starting on A. Em uses all six.
Avoid these common mistakes
Lifting the pivot finger
Watch your middle finger as you change. It should stay on the D string at the second fret.
Clamping your hand in place
The pivot is a reference point. Keep your wrist comfortable and allow your hand to adjust naturally as the other fingers move.
Leaving the ring finger on the G string for Em
Lift it clear so the open G can ring.
Rushing before the notes are clear
Slow down and pick the strings individually. Check that your fingertips aren’t accidentally muting neighbouring strings.
Look for useful connections between chords
Before practising a new chord change, compare the two diagrams. Is there a finger that can stay on the same string at the same fret?
Not every pair of chords has a useful pivot. When one is available, it can reduce unnecessary movement and make the change easier to learn.
Need help reading the shapes? See How to Read Guitar Chord Charts.
For a structured sequence of beginner lessons, explore Open Chords Made Easy.
Ready to put it all together?
Build your skills with a clear sequence of lessons and practical songs. Find a guitar course that fits where you are now.
Useful guitar ideas, occasionally.
Get practical tips, new resources and course updates from Reuben. A little inspiration for your playing, without a crowded inbox.
By signing up, you agree to receive guitar tips and course news by email. Unsubscribe at any time.