How to Read Guitar Chord Charts: A Beginner’s Guide
A guitar chord chart shows where to put your fingers and which strings to play. Once you understand its lines, dots and symbols, you can use it to learn unfamiliar chord shapes.
Watch the video, then use this guide as a quick reference with your guitar in hand.
Which way do you read a chord chart?
A standard upright chord chart shows the guitar neck with the headstock at the top.
The six vertical lines represent the strings. From left to right, they are:
E – A – D – G – B – E
The thickest, lowest-pitched string is on the left. The thinnest, highest-pitched string is on the right.
Think of looking straight at the fretboard of a guitar standing upright—not looking down at it while you play.
What do the horizontal lines mean?
The horizontal lines represent the frets. Place your fingers in the spaces between them.
A thick line at the top usually represents the nut, which sits between the headstock and the fretboard. The space immediately below it is the first fret.
If the chart shows a shape farther up the neck, a number beside the diagram usually identifies the starting fret. For example, 5fr means that the diagram starts at the fifth fret.
What do the dots and numbers mean?
A dot shows where to press a string. Match its vertical string line with its position between the horizontal fret lines.
Numbers inside or beside the dots usually tell you which fretting-hand finger to use:
- 1 — Index finger
- 2 — Middle finger
- 3 — Ring finger
- 4 — Little finger
Some charts use T for the thumb.
Finger numbers are different from fret numbers. A 3 inside a dot usually means “use your ring finger”, not “play the third fret”.
Some diagrams label dots with note names or musical intervals instead. Check the chart’s legend when the labels differ.
What do X and O mean?
The symbols above the strings tell you what to do with strings that may not have a finger placed on them:
- O means play the string open, without pressing it against a fret.
- X means do not sound that string.
Before you strum, check where to start. Not every chord uses all six strings.
Try reading an open C major chord
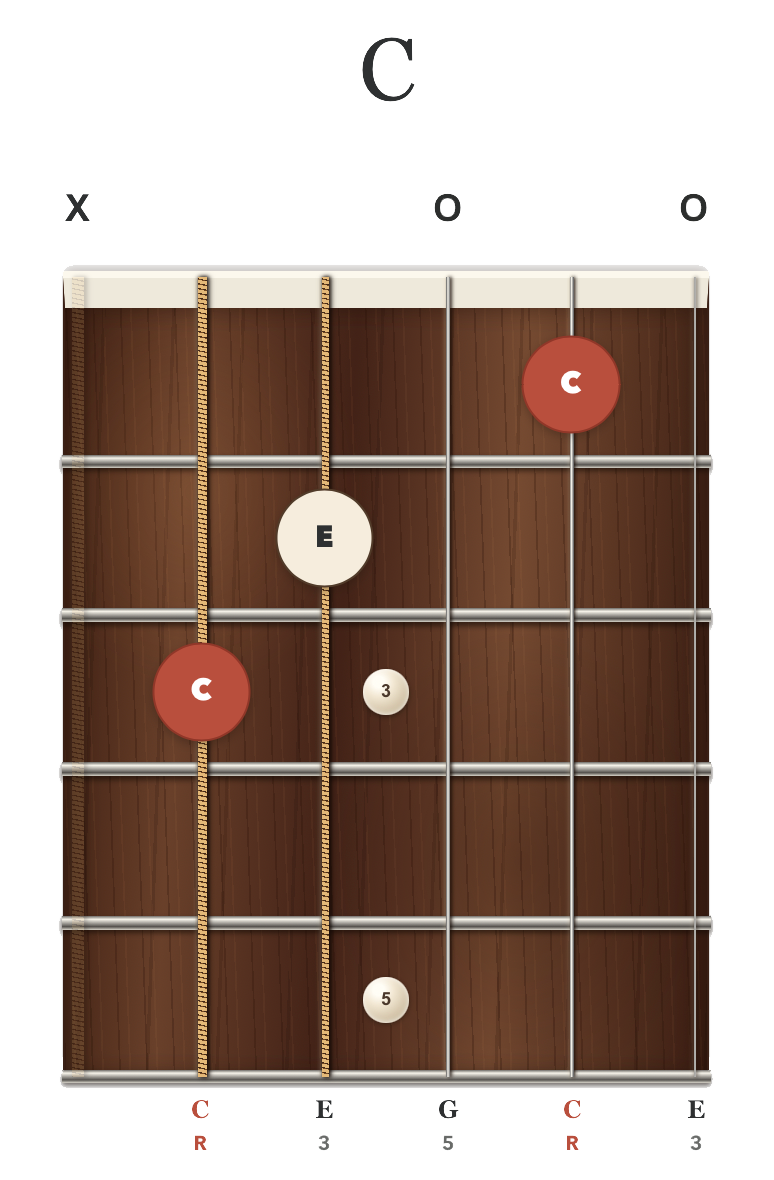
The chord name C means C major. A common open C shape uses these positions:
- Low E, sixth string: do not play.
- A, fifth string: third fret with your ring finger.
- D, fourth string: second fret with your middle finger.
- G, third string: play open.
- B, second string: first fret with your index finger.
- High E, first string: play open.
Strum from the fifth string down, leaving out the low E string.
Then pick the five strings individually. Listen for clear notes and check whether a finger is accidentally touching a neighbouring string. Place each fingertip just behind the fret wire, towards the guitar’s body, using enough pressure for a clear sound without squeezing harder than necessary.
What does a curved line across several strings mean?
A curved line or bar spanning several strings usually indicates a barre: one finger presses more than one string at the same fret.
The accompanying finger number often identifies which finger to use. Some charts show the same instruction with an elongated shape instead of a curved line.
You don’t need to master barre chords to start reading chord charts. Begin with a familiar open chord and learn to match each symbol to your guitar.
Is a chord chart the same as TAB?
No. A chord diagram shows a chord shape: where to place your fingers and which strings to sound. It usually doesn’t tell you the rhythm or the order in which to play those strings.
Guitar TAB uses six horizontal lines for the strings, with numbers indicating the frets to play. You read it from left to right as the music progresses.
That difference is easy to mix up:
Upright chord diagram: vertical lines are strings.
TAB: horizontal lines are strings.
Turn the chart into a clear-sounding chord
Each time you learn a new shape:
- Read the chord name and check its fret position.
- Find the strings marked X or O.
- Place your fingers on the marked strings and frets.
- Pick each intended string individually to check the sound.
- Strum the chord once the notes are clear.
Take your time. Reading the diagram accurately is more useful than rushing to memorise another shape.
Want to understand how those chord notes relate to scales? Read Scales vs Arpeggios on Guitar: What’s the Difference?.
Ready to put it all together?
Build your skills with a clear sequence of lessons and practical songs. Find a guitar course that fits where you are now.
Useful guitar ideas, occasionally.
Get practical tips, new resources and course updates from Reuben. A little inspiration for your playing, without a crowded inbox.
By signing up, you agree to receive guitar tips and course news by email. Unsubscribe at any time.